Homebrew #27: Cupid & Psyche
¶ by Rob FrieselInspired by Tazo’s Passion herbal tea, this brew was intended as an early Xmas present to my wife, 1 who had expressed a fondness for it, 2 and was looking for something special to drink over the holiday break. Thus was born the formulation for Cupid & Psyche:
In the initial assessment, it was the rose hips that had us intrigued. This should not have been surprising; after all, rose hips were the unique flavor that first had me swooning over Southern Tier’s Compass sparkling ale. With a Xmas brew in mind, I began work on this formulation in October of 2015. 3 The tea itself has a lot going on: hibiscus, orange peel, rose hips, passion fruit extract, licorice root, cinnamon, and lemongrass. I drank quite a few cups figuring out which flavors were most prominent, and which I could mimic through yeast or hops. After several months, and after starting over an equal number of times with different base styles, I eventually settled on a formulation that seemed like it could work.
My original idea of using British pale ale (BJCP 11A. – 11C.) seemed like it would be too malty. Australian Sparkling Ale (BJCP 12B.) was another option but that style has too narrow of a definition. A Belgian pale ale (BJCP 24B.) was a strong contender for a while, but the characteristic yeast might interfere. An APA (BJCP 18B.) or a Blonde Ale (18A.) were both fairly safe, but… I wanted something stronger. This more or less left me with that fun catch-all: American Strong Ale (BJCP 22B.).
Having finally settled on a base style, a full year after first getting the idea, I was happy with how the formulation looked and was ready to brew.
Brew Day
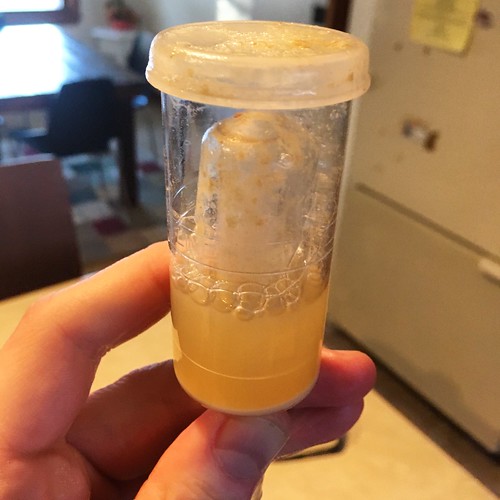
I fired up a starter for my yeast (WLP001) two days ahead of time. This was later of a start than I would normally prefer, but all things considered, I decided pitching the whole starter (supernatant and all) without decanting would be fine.
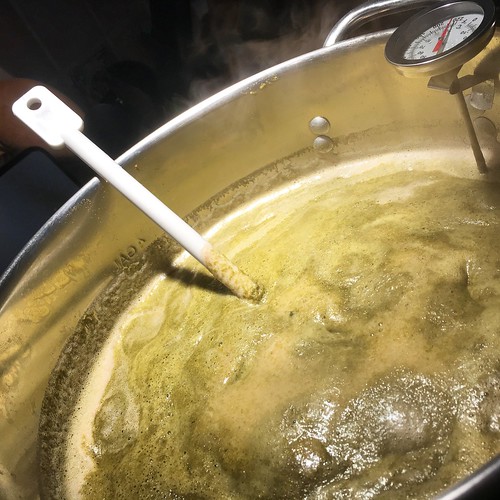
The morning of brew day, I got my strike water started and my grains milled; I mashed in at about 152°F and set about to hold that for 75 minutes. When the mash timer ended, the temperature had fallen to 147°F; I had about 3 gallons of wort at 1.086 (20%Br). Next, I added the DME (the full 3 lb., not just the planned 2 lb. 12 oz.) and got the gravity up to 1.121 (27.4%Br). From there: more heat, got it to boiling, and followed my hop schedule.
After chilling, I had about 2.5 gallons at 1.147. 4 I added 2 gallons of water to the carboy, transferred the wort, and topped off with another half gallon. I took another gravity reading, noting that the wort was 66°F; after adjusting for the hydrometer’s temperature calibration, and adjusting again for the +4 offset, I settled on 1.073 as my original gravity. That’s six points off from my target (1.079) but close enough considering I’d also “over-planned” on fermentables to compensate for this (more on that later, vide infra).

Satisfied with the initial conditions, I shook the carboy for two minutes to aerate, pitched, shook a little more, and moved it to the fermentation chamber.
A Brief Aside About My Gravities
Like most homebrewers (I assume) — I obsess quite a bit about my gravities. I want to know that given a certain amount of grain mashed at a certain temperature in a certain amount of water 5 for a certain amount of time that I’m going to get a wort with a certain specific gravity. And I’m not necessarily looking for high precision here — it doesn’t need to be perfect. But I’d like to know that I’m going to be within 1-2 points. That seems reasonable, right?
So… (I ask myself) how come I’m so far off?
When formulating this batch, I’d targeted 1.079 as my O.G — and I’d targeted that because I’d historically 6 been 4 points below that targeted gravity. My thinking here was that if I wanted a 1.075 beer then maybe I should shoot for 1.079 and let the averages work in my favor. So coming in at 1.073 was that 1-2 points off… from the 1.075 which was -4 from the 1.079 target and… I can’t shake the feeling that instead of “nailing it” by planning my actual starting gravity around the average margin of error, I just further blew it by landing at an additional two points below that.
GRANTED: I probably should let all that go. After all, I should be am going for flavor. And I can get a great tasting beer without fussing over gravity. But I’m also the son of a molecular biologist and I’ll be damned if I can’t master the science of mashing. So all that business about not being able to get my gravities right is bugging me.
Then I get my first copy of Brew Your Own magazine and I’m reading some of the “fine-print” in the front matter and I see where they call out that their recipes are published assuming a 65% brew house efficiency. Looking at my formulations in BeerSmith, I see that I’ve been using 72%. So that, combined with the fact that I only just recently 7 discovered that my hydrometer has an offset… And (well…) that goes a long way in explaining the factors that have gone into my confusion.
Having connected those dots, I feel like I’m starting to get a clearer picture of how I came to get these “bad” estimates, and how I can go about getting better estimates going forward.
End of Aside; Beyond Brew Day
File this one under I Should Have Known Better…
At +17 hours post-pitch I had a nice, thick, very healthy-looking cap of krausen. Peeking in on it again after a few hours, that same krausen was collecting in the airlock. “Should have used a blow-off tube,” I told myself. Which is funny because so many other brewers tell me that this is just part of their normal routine — but it’s just not something I think of until it’s too late. Anyway… I had to swap out the airlock twice before things settled down.
A week after pitching, I took a gravity reading and found that it had dropped to 1.011.

At this point we were about to leave for our Thanksgiving trip so… I gently roused the yeast and unplugged the temperature controller. Given that I typically let a beer sit about two weeks in primary, and given that the basement’s ambient temperature was about 65°F, it seemed to me that the timing had worked out perfectly.
Fast forward another week and we return from our trip; another gravity reading and we’re still sitting at 1.011. As such, it was time to rack it over to the 5 gallon carboy for a little conditioning.
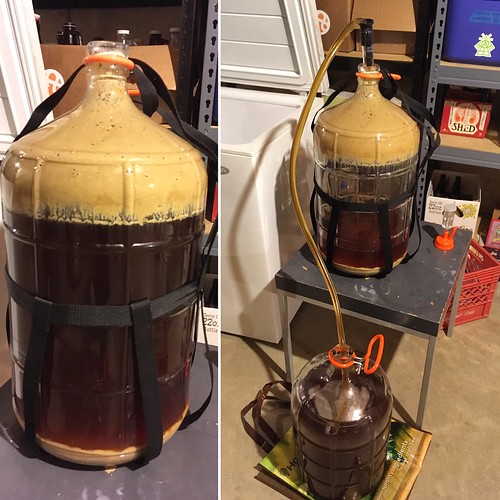
Because “2 weeks primary, 2 weeks secondary” had worked out well for several brews over these past two years, I decided to run with that. Once it was racked, I let the beer sit for about a week and a half. At that point, I added 2 ounces of Mandarina Bavaria for dry-hopping and 1 ounce of rose hips. Those sat for five days. Then I pulled the flavor agents 8 and transferred the beer (which was smelling great, thanks for asking) to a keg.
Four days under approx. 24 PSI; vent the headspace and lower to 12 PSI, then let it sit for another four days and… We’re pouring a lovely American Strong Ale.
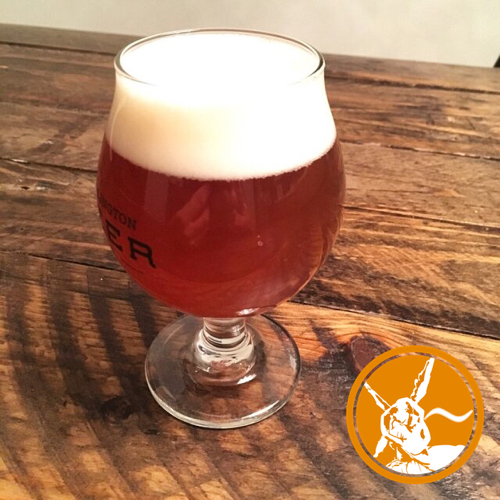
It turned out a little cloudier 9 and slightly darker than I expected but that’s OK — the aromatics and flavors more than make up for it. The Mandarina Bavaria dry-hopping shows with a lovely wash of citrusy orange aromas and up-front flavors. The rose hips add a fresh botanical note that’s hard to place but really rounds it out. I personally don’t pick out anything that is distinctly contributed from the licorice root — but the overall profile works. A fairly aggressive bitterness at the finish, but I’d say it’s well-balanced with the starting sweetness.
Most importantly, my wife loves it.
I don’t know that I nailed the original flavor target (i.e., that Tazo Passion tea) but it’s certainly drinkable. Perhaps dangerously so considering the 8.3% ABV. Would I brew it again? Very likely.
Recipe
The partial mash recipe for Cupid & Psyche is as follows.
Mash Grains
- 7 lb. 8 oz. Briess 2-row brewer’s malt
- 2 lb. Briess white wheat malt
- 12 oz. Great Western Crystal 60
Fermentables
2 lb. 12 oz. 3 lb. Briess Golden Light DME 10
Hop Schedule
- 2 oz. Chinook (60 min.)
- ½ oz. Amarillo (30 min.)
- ½ oz. Amarillo (5 min.)
- 1 oz. Mandarina Bavaria (flame-out)
- 2 oz. Mandarina Bavaria (dry-hop 5 days)
Spices
- ½ oz. licorice root (boil 5 min.)
- 1 oz. rose hips (secondary 5 days)
Yeast
White Labs WLP001 California Ale
Prepare a 1300 milliliter starter 2-3 days before brew day.
Brew Day
- Collect 14.42 qt. water and heat to 162.4°F. Mash in; hold at 152.1°F for 75 minutes.
- Mash out. Heat to 168° over 7 minutes; hold for 10 minutes.
- Remove filter bag from water. Squeeze filter bag to extract as much liquid as possible for wort.
- Top off as necessary to approx. 3 gal.
- Bring to a boil. Boil for 60 minutes, adding 3 lb. Golden Light DME and following hop schedule described above.
- Cool to 70°F as rapidly as possible and top off the fermentor to reach 5 gal.
- Aerate wort; pitch White Labs WLP001 yeast from starter.
- Place in fermentation chamber and ferment at 68°F.
Beyond Brew Day
- Allow fermentation to complete (approx. 2 weeks) at approx. 68°F.
- Rack to secondary for conditioning.
- Approximately 5 days before packaging, add 2 oz. Mandarina Bavaria and 1 oz. rose hips for dry-hopping.
- Rack to keg. Drop temperature to 38-40°F and connect to CO₂ at 30 PSI.
- After 24-36 hours, turn off gas and purge CO₂ from the headspace.
- Turn gas back on at 12 PSI and wait 2-4 days.
- Enjoy.
Details
Cupid & Psyche, an American Strong Passionate Ale by Tilde Gravitywerks
| Original Gravity | 1.073 |
| Final Gravity | 1.011 |
| ABV | 8.3% |
| Attenuation | 85.4% |
| IBU | 43 |
| SRM | 9 |
| Links | Untappd Flickr |
- Regular readers will recall I did this for her two years ago, as well.[↩]
- A fondness for the tea, not the beer, which hadn’t been brewed yet.[↩]
- Note that I didn’t say which Xmas, exactly.[↩]
- The sample I dropped onto the refractometer were greater than 32%Br — basically off those particular charts.[↩]
- See also: pH and mineral content…[↩]
- ”Historically” here referring to at least the past six batches.[↩]
- This discovery having taken place within the past 2-3 months of this brew day. See also: “Brief Aside About Calibrating Equipment” on the blog post about brewing Birdwatcher.[↩]
- Which… that’s always such an ordeal to get all that junk out through the neck of the carboy. You’d think I’d have learned my lesson by now.[↩]
- Next time I do something like this I’ll maybe give it a day or two to settle after pulling the flavor agents and/or fine it. But I’d give it some chance to clear before packaging.[↩]
- I made reference to this on-the-fly change earlier in this blog post, but if you’re just skimming it to look at the recipe: take a look at the “A Brief Aside About My Gravities” heading. Given that I’d originally formulated this targeting an O.G. of 1.079, and given that I did so assuming that I would be off by 4 points, and noting that my post-mash gravity felt suspiciously low, I dumped in the whole bag of DME rather than portioning off four ounces. Anyway: I’ve adjusted the formulation here for clarity.[↩]
Leave a Reply